Installing Applications with PowerShell App Deployment Toolkit - Part 1
Table of Contents
- Table of Contents
- Introduction
- Getting Started
- Building the Deployment Package
- Troubleshooting
- Deploying and Using the Package
- Next Steps
This is Part 1 in a 2-part series.
- Part 1
- Part 2
Introduction
For over a year now, I’ve been the primary software administrator for our organization’s SCCM infrastructure. This means I’ve been responsible for integrating software installs in our workstation build process, but I’ve also had to deal with the issue of deploying and updating software on end-user workstations.
Administering software deployments presents a unique set of challenges:
- I need the ability to perform a fully automated, silent install. If I have to click a “Next” button once on an installation welcome, license agreement, or confirmation dialog, then someone will need to be able to click the “Next” button each time the software is installed on a new workstation or server.
- I often need the ability to perform post-install configuration. For example, I need the ability to disable Java’s automatic updates so our updates can be centrally managed.
- I need a flexible logging framework so that when things go wrong (not if, but when), I know exactly where to look to find out more information on what happened.
- If applications or updates need to be deployed while a workstation is in use, I need the ability to display an informative message to the user that they can easily understand, while preventing them from accidentally interrupting the install (or starting an application while it’s updating).
It seems pretty obvious that we’ll need the ability to make decisions specific to each applicion, but it also seems like we’ll need a single set of tools available to us for software installations.
The PowerShell App Deployment Toolkit is a free toolkit that provides some answers to these challenges. It also helps to prevent re-inventing the wheel each time a new application needs to be deployed. The toolkit is designed for ease of use with solutions such as SCCM, but it’s easily usable with other configuration management solutions such as MDT, Chef, or even PowerShell’s own DSC.
There is some documentation provided with the toolkit, but I’ve heard from some people that actually writing their first installation is a daunting task. Let’s dig in and create a simple scripted install!
Getting Started
We’ll use Mozilla Firefox as an example, since it’s a pretty simple program to package, but also a program that’s pretty commonly deployed.
Downloading files
Download the latest version of the toolkit and extract it. We’ll want to maintain a “clean” copy of these files so we can copy them into future builds.
Check out everything packaged in the download:
- The Toolkit directory contains the actual files in the toolkit. We’ll copy this directory each time we need to create a new install.
- The Examples directory provides a couple of examples of toolkit uses - Adobe Reader and Office 2013. These are great for getting a better idea of how the toolkit works.
- A changelog file.
- And finally…a Word document, PSAppDeploymentToolkitAdminGuide.docx. This provides all the documentation on the functions included in the toolkit. This will be your best friend as you reference the functions in the toolkit!
We’ll also need to download the Firefox setup file. Be sure to download the one from this page, and not the one from the Firefox homepage; that file is a “stub” installer that downloads the real setup files in the background. Stub installers are often difficult to script.
Preparing the environment
Copy the contents of the Toolkit folder into a new working directory:
Copy-Item C:\Users\replica\Downloads\PSADT\Toolkit C:\Users\replica\Documents\Deployments\Firefox -RecurseYou should now have a directory with three folders and three files. In some cases, either the Files or the SupportFiles directories are missing; if so, feel free to create them. Your work directory should look like this:
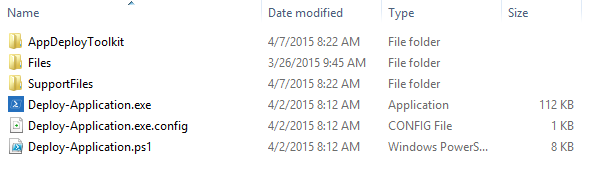
Let’s talk about these files and folders for a moment.
- The AppDeployToolkit directory is where the “guts” of the toolkit live. Inside this folder is an XML file with a lot of configurable preferences for how the toolkit behaves, an ICO image used when the toolkit runs, a PNG banner image which can be customized to “brand” the toolkit, and three PS1 script files which contain the actual toolkit logic.
- The Files directory is the directory where the setup files belong. If you have a single setup.exe file or MSI installer, those files should be placed in this directory. If you have a large install that requires a lot of files (think Microsoft Office), all of those files go in here, too.
- The SupportFiles directory is an extra directory which can be used for configuration files, post-install settings, and anything extra you may need. I’ve used this for small utility programs to clean up old versions of applications, for example.
- Deploy-Application.ps1 is the file we care the most about. This is the PowerShell script we will modify to contain the actual install logic (“run this setup file with thees arguments”). In most cases, this is the only script you will need to modify to make your application work correctly.
- Deploy-Application.EXE is a small EXE file which basically invokes the PowerShell script. This is provided as a convenience, so you don’t need to invoke
powershell.exe -ExecutionPolicy Bypass -NoProfile -NonInteractive -WindowStyle Hidden -File Deploy-Application.ps1(plus any additional parameters to the script) in order to start the install.
Building the Deployment Package
Copy the downloaded Firefox file from your Downloads folder to the Files directory inside the toolkit:
Copy-Item "C:\Users\replica\Downloads\Firefox Setup 37.0.1.exe" "C:\Users\replica\Documents\Deployments\Firefox\Files\Firefox Setup 37.0.1.exe"Now for the fun part: it’s time to write some PowerShell. Open Deploy-Application.ps1 in the ISE.
Defining some variables
At the very top of the Deploy-Application.ps1 script, you’ll see a great example of comment-based help. The first couple of things we need to change are the application variables - the constants that define what program we’re using. At about line 58, you’ll see a block that looks similar to this:
##*===============================================
##* VARIABLE DECLARATION
##*===============================================
## Variables: Application
[string]$appVendor = ''
[string]$appName = ''
[string]$appVersion = ''
[string]$appArch = ''
[string]$appLang = 'EN'
[string]$appRevision = '01'
[string]$appScriptVersion = '1.0.0'
[string]$appScriptDate = '04/02/2015'
[string]$appScriptAuthor = '<author name>'
##*===============================================
Edit these variables to reflect an installation for Mozilla Firefox:
##*===============================================
##* VARIABLE DECLARATION
##*===============================================
## Variables: Application
[string]$appVendor = 'Mozilla'
[string]$appName = 'Firefox'
[string]$appVersion = '37.0.1'
[string]$appArch = 'x86'
[string]$appLang = 'EN'
[string]$appRevision = '01'
[string]$appScriptVersion = '1.0.0'
[string]$appScriptDate = '04/07/2015'
[string]$appScriptAuthor = 'replicaJunction'
##*===============================================
After setting those variables, we can scroll down a bit more, until we see a comment block:
##*===============================================
##* PRE-INSTALLATION
##*===============================================
Look at the Show-InstallationWelcome line in this section. There are a lot of things we can configure here, but left as the default, this line will produce a GUI pop-up that looks like this:
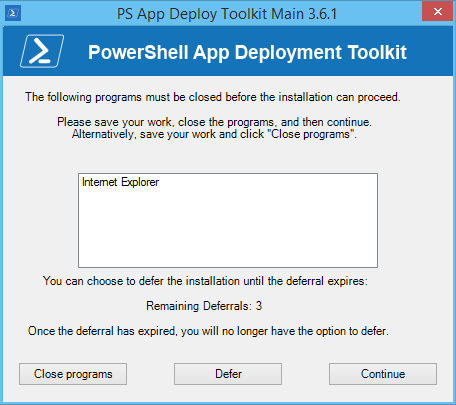
Forcing users to close Internet Explorer doesn’t really make much sense when we’re trying to install Firefox. On the other hand, it would be helpful if we could require users to close any existing version of Firefox before we attempt to upgrade the program, in order to prevent any problems with files in use. Fortunately, this is simple to do with the toolkit by replacing the -CloseApps parameter:
Show-InstallationWelcome -CloseApps 'firefox' -AllowDefer -DeferTimes 3 -CheckDiskSpace -PersistPromptThere are plenty of other things we can customize in this screen, but the default options will do the job nicely for now.
A word on deployment modes
Showing a welcome message and prompting users to close apps doesn’t exactly qualify as a fully silent install, especially when the user must click one of the buttons in the dialog in order to proceed with the installation. One parameter for the Show-InstallationWelcome function allows you to specify a “countdown” until the applications in question are forcibly closed, but that still doesn’t address the root issue.
Fortunately, the toolkit offers a concept called deployment modes which solves this problem nicely. There are three different deployment modes in which the install can be run:
- Interactive - All dialog messages will be displayed. This is the default in mast cases.
- Silent - No dialog messages will be displayed during setup, but some important windows may still be displayed (such as the welcome dialog prompting the user to close applications).
- NonInteractive - “very silent,” with no blocking apps.
The toolkit contains a bit of logic to automatically detect when it is run from a SCCM task sequence, but in general, it’s best to specify the deployment mode at the command line if you’d like a specific mode to be used. I find Silent not to be very useful, so I tend to either not supply a deployment mode or set it to NonInteractive. The Show-InstallationWelcome function immediately checks to see if the deployment mode is NonInteractive, and if so, it does not display a blocking message.
Running the Firefox setup file
We’re done with the Pre-Installation phase for now, so scroll down a bit further in the script to the Installation phase. Underneath the comment labeled <Perform Installation tasks here>, we’ll need to tell our script to actually run the Firefox installation.
Finding the silent path
Wait a moment…how do we install Firefox without requiring the user (or tech) to click Next, Next, Next…Finish?
Unfortunately, there’s no silver bullet for performing a silent install. You’ll need to spend a bit of time researching the individual software in question to find out what options its installer supports. In this case, I was able to search Google for the phrase “Firefox silent install” and the top search result was exactly what I was looking for: a page on Mozilla.org listing command-line arguments for the Firefox install. A quick glance at that article leads to this segment:
Silent install (always installs into the default location. Use the “Configuration ini file” option below to set the install location and other install options):
<path to setup executable> -msSilent uninstall:
<path to setup executable> /SConfiguration ini file:
<path to setup executable> [/INI=<full path to configuration ini file>]When specifying a configuration ini file the installer will always run silently. When specifying a Configuration ini file other command line switches should not be specified and may have unexpected results
That’s exactly the information we were looking for!
Performing the install
Using PowerShell alone, there are a few different ways we could start a setup file with arguments (Start-Process, Invoke-Expression, using the WMI method Win32_Process.Create(), or even just typing the filename). These methods will all work just fine - this is still PowerShell, after all - but they don’t take advantage of the features available to us in the toolkit. Instead, let’s use a toolkit method called Execute-Process to start our setup:
Execute-Process -Path 'Firefox Setup 37.0.1.exe' -Parameters '-ms'(Astute PowerShell fans will note that Execute is not an approved PowerShell verb. This is quite true, and technically, the team behind the PowerShell App Deployment Toolkit should probably rename both this function and its sibling, Execute-MSI. However, since this is a script toolkit rather than a general-purpose module, it’s not the end of the world. The toolkit is also thoroughly documented to make sure that these functions are visible.)
What does this function give us that native PowerShell does not?
- Easy access to the Files subdirectory without worrying about working directories.
- Ability to transparently ignore errors using -ContinueOnError if desired, or only ignore specific error codes using -IgnoreExitCodes
- In-depth logging, even attempting to capture the standard output of the process in some cases
- Error checking for common error codes from msiexec and wusa
Since our Firefox setup file is within the Files directory of the toolkit, we don’t need to specify the working directory or even the full path to the setup file. The Execute-Process function takes care of all of this for us.
Believe it or not, that’s all we need to do! If you run the Deploy-Application.EXE as an administrator, Firefox will be installed on your system, with no required user interaction except the welcome window. We’re not done yet, though - this toolkit offers the ability to script an uninstall just as easily, and in many cases it’s helpful to be able to uninstall an application silently as well.
Adding an uninstall
In the Deploy-Application.ps1 script, scroll down to the PRE-UNINSTALLATION section. You’ll notice another Show-InstallationWelcome function, so go ahead and change the CloseApps parameter from iexplore to firefox again. Here’s an example of the CloseAppsCountdown parameter; this will force Firefox to close after 60 seconds if no options are selected. Personally, I prefer to change this to something a bit higher, like 180 seconds (3 minutes).
Scroll a little further down, to the UNINSTALLATION section. Underneath the comment labelled Perform Uninstallation tasks here, we’ll add the command to trigger an uninstall of Firefox.
Execute-Process -Path 'Firefox Setup 37.0.1.exe' -Parameters '/S'The /S argument is again taken from the Mozilla article we found earlier. As it turns out, we can use the same file to uninstall Firefox as we can use to install it, and it supports a silent uninstallation as well.
Now, we can uninstall Firefox using the same Deploy-Application.EXE using an argument on the command line:
Deploy-Application.exe UninstallTroubleshooting
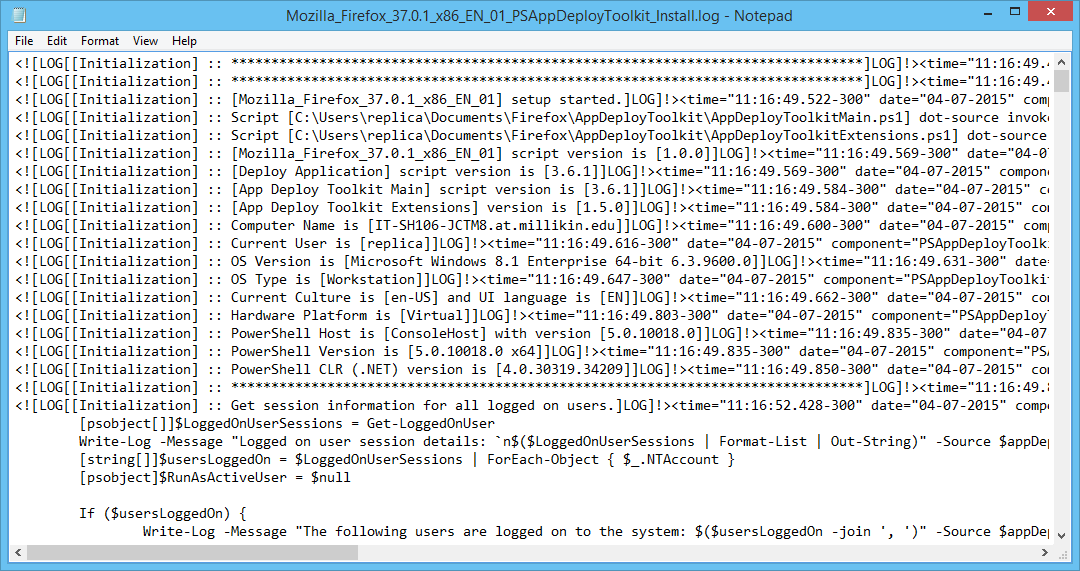
If the installation (or the uninstallation) didn’t work as expected, it’s time to look at the log files. By default, these are saved at C:\Windows\Logs\Software, but this path can be changed in the config XML file located within the AppDeployToolkit folder.
The name of the log file generated is based on the application variables we declared at the very beginning. In this case, we’re looking for either Mozilla_Firefox_37.0.1_x86_EN_01_PSAppDeployToolkit_Install.log or Mozilla_Firefox_37.0.1_x86_EN_01_PSAppDeployToolkit_Uninstall.log, depending on whether we’re troubleshooting an install or an uninstall. Open this file up and…whoa!
By default, the toolkit writes its log files in a similar format to logs from SCCM. To make sense of these log files, download and install the System Center 2012 R2 Configuration Manager Toolkit. There are several utilities in here useful for troubleshooting SCCM, but the utility we’re interested in right now is a small file called CMTrace. This is a SCCM log file viewer that can parse logs in that format much more easily. Even if you do not use SCCM in your environment, CMTrace will make it much easier to read the log files from this toolkit.
After installing, launch CMTrace.exe (there should be a shortcut in your Start menu), and it will offer to become your default viewer for .log files. After saying yes, re-open the log file left from the toolkit, and you’ll see a much happier sight.
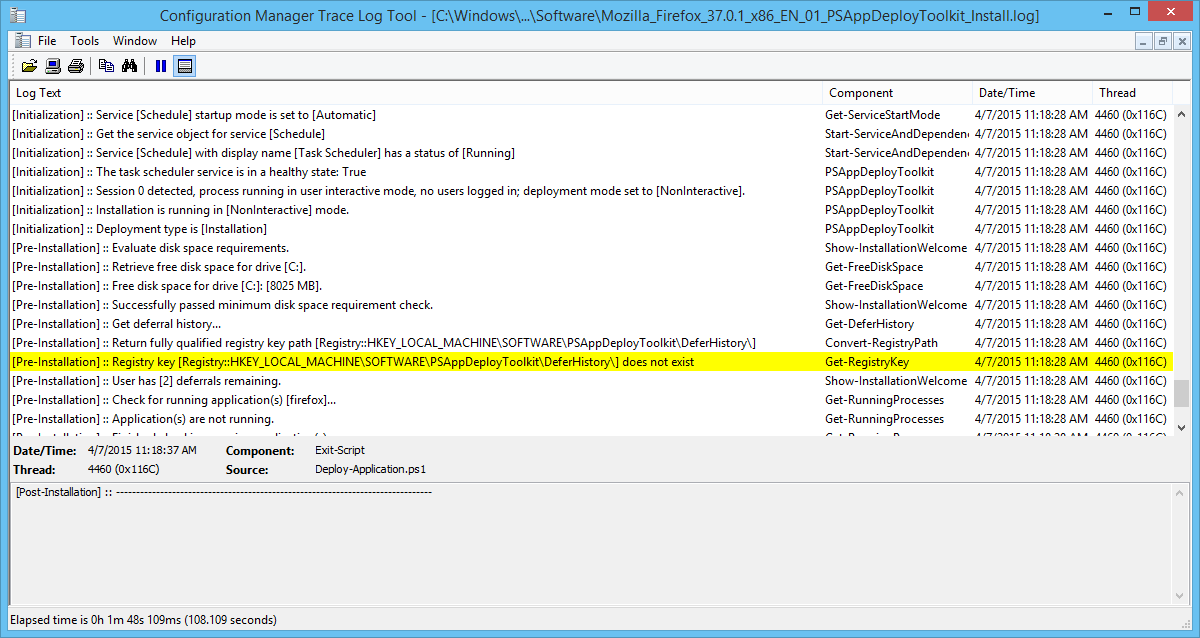
In CMTrace, any log entries which contain keywords such as “error” or “failed” will be highlighted in red. Keywords like “warning” will cause a yellow highlight. Here’s an example of a case when the main Firefox setup file failed with error code 1:
![The line in question will read something like, "Execution failed with exit code [1]."](/public/img/blog/2015-04-07-psadt-1/psadt-log-cmtrace-error.png)
CMTrace, when combined with the extensive logging left by the toolkit, makes it a snap to find out where the installation failed. You can also write additional log entries to these log files using the Write-Log function of the toolkit, in case you want to extend the logging with your own information.
Deploying and Using the Package
We’ve now built a fully-functional scripted installation of Firefox. Let’s review the features we’ve got available to us, with just a few lines of code:
- Automated install and uninstall of Firefox using the same basic framework
- User prompt to close Firefox if it’s running
- Verbose logging
The last challenge that we need to deal with is how we can invoke the install on computers, either on demand or en masse. This is out of the scope of this toolkit (it handles software installation, not software deployment), but it does integrate nicely with several different technologies.
To install the application, you can use any of these commands, depending on your needs:
Deploy-Application.EXE
Deploy-Application.EXE Install
Deploy-Application.EXE Install Interactive
Deploy-Application.EXE Install NonInteractive
To uninstall the application, these commands will work (note that the Uninstall argument is necessary this time):
Deploy-Application.EXE Uninstall
Deploy-Application.EXE Uninstall Interactive
Deploy-Application.EXE Uninstall NonInteractive
I recommend copying the files to a temporary location on the remote computers first, but in theory the toolkit should run over the network just as well. If you do copy them, you’ll need to copy the entire directory (containing AppDeployToolkit, Files, SupportFiles, and the Deploy-Application EXE, script, and config file). Treat the entire directory like a single software package and keep it together wherever you copy it or move it.
Next Steps
Be sure to read through the Word document included with the toolkit download, as it contains a lot of helpful information and references for toolkit functions.
I’m well aware that in the grand scheme of things, Firefox is a pretty easy example of software deployment. I will almost certainly be writing a follow-up to this article with some more chewy examples. In the mean time, though, dig in! Get your hands dirty and try building some deployment scripts on your own. It’s almost always easiest to learn by doing.
Finally, if you have an example of application deployment gone right (or horribly wrong), let us know in the comments!
See you all next time.
-replica