Installing Applications with PowerShell App Deployment Toolkit - Part 2
Table of Contents
- Table of Contents
- Welcome back!
- Preparing to Install
- Building the Package
- Deploying and Using the Package
- Next Steps
This is Part 2 in a 2-part series.
- Part 1
- Part 2
Welcome back!
After a bit of a hiatus, I’m back and ready to write the long-anticipated follow-up to Part 1 of this N-part series. I’ve taken a new position at a new company, and I no longer have access to an SCCM environment…but I’m still using PSADT to create software packages!
In my previous post, we went over the basics of the PowerShell Application Deployment Toolkit (PSADT) and built a working software package for Mozilla Firefox, including both an unattended install and uninstall.
After working with software packages, though, you’ll quickly discover that very few of them are quite this cut and dry. Most software applications require quite a few more hoops to install and uninstall interactively than Firefox, and I’ve dealt with several that have made me want to pull my hair out in the past.
Fortunately, this is what PSADT was designed for! Using a toolkit like this allows us to abstract the steps for installing and configuring software.
We’re going to use a more elaborate example in this case: Java 8. The latest version as of this post is Java 8 update 101.
Preparing to Install
The first thing we’ll need to do is get the install files and identify the command-line options for installation. This part will be pretty unique to each program - some installations take a lot of effort to automate, while others are pretty simple.
Getting the install files
When installing Java yourself, you’re typically redirected to a generic download page. This downloads a small “stub” installer (in my case, it was about 550KB), and running this installer downloads the real setup files to a temporary location.
Stub installers like this are typically designed to be friendly to home users installing products themselves, but they tend to be difficult to automate.
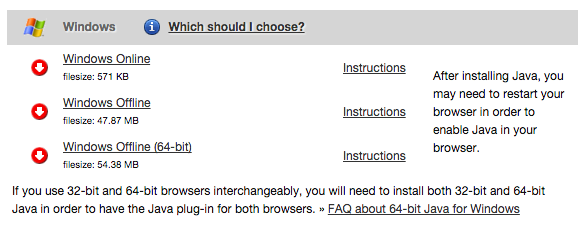
Instead of downloading from the big friendly red button, look to the bottom of this page for the link that reads “See all Java downloads.” This will provide options to download either an online or offline install. The online install checks in at 550KB, and the offline install reads 47.8MB (for the 32-bit version). That looks much more likely to include the files we need.
The file we downloaded, jre-8u101-windows-i586.exe, is a setup.exe file. In the past, I’ve typically tried to extract these files to get access to the underlying MSI file - MSI files play very nicely with SCCM, as well as with PSADT. A lot of people online will also suggest trying to extract the EXE file. With Java 8, though, I had to jump through a lot of hoops to get to the MSI file, and when I tried installing that, I received an error that there was a problem with the installer package.
If you’re lucky enough to have an Oracle support agreement, Oracle provides an MSI installer. Since I’m not, though, I’ve decided to work with the downloaded setup.exe file.
Identifying the command-line arguments
After some research, I came across Oracle’s page on installation with a config file. Since it looks like we can point to a custom config file, we’ll be able to build this config file and place it in our project directory. The file will be deployed with our installation.
Building the Package
Create a new working directory for the Java 8 install, and copy the PSADT files into this directory.
New-Item -Path C:\Users\replica\Documents\Deployments\Java8u101 -ItemType Directory -Force
Copy-Item -Path C:\Users\replica\Downloads\PSADT\Toolkit -Destination C:\Users\replica\Documents\Deployments\Java8u101 -Recurse
Copy the Java setup file into the Files directory (Files is the “main” installation file location):
Copy-Item -Path C:\Users\replica\Downloads\jre-8u101-windows-i586.exe -Destination C:\Users\replica\Documents\Deployments\Java8u101\FilesCreating the config file
For our config file, we’ll use the SupportFiles directory of the toolkit. This directory can really be used for anything you want, but its intended purpose is for files like this - files that aren’t quite part of the “core” install, but are used for installation helpers and such.
Your exact requirements may vary depending on your organization, but based on Oracle’s page above, I used this PowerShell to create my config file:
Set-Content -Path C:\Users\replica\Documents\Deployments\Java8u101\SupportFiles\java.settings.cfg -Value @'
AUTO_UPDATE=Disable
EULA=Disable
INSTALL_SILENT=Enable
NOSTARTMENU=Enable
REBOOT=Disable
SPONSORS=Disable
WEB_ANALYTICS=Disable
'@
Writing the deployment script
Now for the moment you’ve all been waiting for: time to edit Deploy-Application.ps1.
ise C:\Users\replica\Documents\Deployments\Java8u101\Deploy-Application.ps1Variables
Scroll down to the VARIABLE DECLARATION section and add some variables. (In PSADT 3.6.7, this begins at line 55.)
##*===============================================
##* VARIABLE DECLARATION
##*===============================================
## Variables: Application
[string]$appVendor = 'Oracle'
[string]$appName = 'Java Runtime Environment'
[string]$appVersion = '8.101' # I use this convention instead of "8 update 101" because it can be converted to a Version object
[string]$appArch = 'x86'
[string]$appLang = 'EN'
[string]$appRevision = '01'
[string]$appScriptVersion = '1.0.0'
[string]$appScriptDate = '8/18/2016'
[string]$appScriptAuthor = 'replicaJunction'
##*===============================================
Pre-Installation
For a Java install, we’ll likely need to close Web browsers (IE, Firefox, and Chrome). Jump down to the PRE-INSTALLATION section (line 106) and make some changes:
##*===============================================
##* PRE-INSTALLATION
##*===============================================
[string]$installPhase = 'Pre-Installation'

## Show Welcome Message, close Internet Explorer if required, allow up to 3 deferrals, verify there is enough disk space to complete the install, and persist the prompt
Show-InstallationWelcome -CloseApps 'java,iexplore=Internet Explorer,firefox=Mozilla Firefox,chrome=Google Chrome' -AllowDefer -DeferTimes 3 -CheckDiskSpace -PersistPrompt
In our Show-InstallationWelcome line, you may notice the -CloseApps parameter is a bit more elaborate than the example given. This allows us to specify a “display name” in addition to the process name of applications that need to be closed. Instead of receiving a message that they need to close “iexplore,” users will get a prompt to close “Internet Explorer.”
Installation
Here’s where we’ll actually call the Java setup file, using the toolkit’s Execute-Process function. This starts around line 120.
Again, I got these command-line parameters from Oracle’s site.
##*===============================================
##* INSTALLATION
##*===============================================
[string]$installPhase = 'Installation'

# ...

## <Perform Installation tasks here>
Execute-Process -Path "$dirFiles\jre-8u101-windows-i586.exe" -Parameters "INSTALLCFG=$dirSupportFiles\java.settings.cfg /L $configToolkitLogDir\jre-8u101-windows-i586.log"
Notice that I’m using some variables here for file paths. These are variables built into the toolkit that provide a quick reference to some locations:
- $dirSupportFiles - full path to the SupportFiles directory
- $configToolkitLogDir - directory where the toolkit log files are saved. This can be defined in the toolkit’s config.xml file. I use this to store the log file Java creates in the same location as the log file the toolkit creates.
Post-Installation
The Post-Installation section is handy for clean-up tasks, or for modifying application defaults or preferences after the installer has completed. In our Firefox example, there really wasn’t anything we needed to customize here, but there are a couple of things we should “fix” for Java, like disabling Java’s automatic updater with some Registry keys. This section begins on roughly line 134:
##*===============================================
##* POST-INSTALLATION
##*===============================================
[string]$installPhase = 'Post-Installation'

## <Perform Post-Installation tasks here>
Set-RegistryKey -Key "HKEY_LOCAL_MACHINE\SOFTWARE\JavaSoft" -Name "SPONSORS" -Value "DISABLE" -Type String -ContinueOnError $True
Set-RegistryKey -Key "HKEY_LOCAL_MACHINE\SOFTWARE\JavaSoft\Java Update\Policy" -Name "EnableAutoUpdateCheck" -Value 0 -Type DWord -ContinueOnError $True
Set-RegistryKey -Key "HKEY_LOCAL_MACHINE\SOFTWARE\JavaSoft\Java Update\Policy" -Name "EnableJavaUpdate" -Value 0 -Type DWord -ContinueOnError $True
Set-RegistryKey -Key "HKEY_LOCAL_MACHINE\SOFTWARE\JavaSoft\Java Update\Policy" -Name "NotifyDownload" -Value 0 -Type DWord -ContinueOnError $True

# Remove Java auto-update item from Run Registry key. This is a "just in case" tweak.
Remove-RegistryKey -Key HKEY_LOCAL_MACHINE\SOFTWARE\Microsoft\Windows\CurrentVersion\Run -Name SunJavaUpdateSched

if ($Is64Bit)
{
    Set-RegistryKey -Key "HKEY_LOCAL_MACHINE\SOFTWARE\Wow6432Node\JavaSoft" -Name "SPONSORS" -Value "DISABLE" -Type String -ContinueOnError $True
    Set-RegistryKey -Key "HKEY_LOCAL_MACHINE\SOFTWARE\Wow6432Node\JavaSoft\Java Update\Policy" -Name "EnableAutoUpdateCheck" -Value 0 -Type DWord -ContinueOnError $True
    Set-RegistryKey -Key "HKEY_LOCAL_MACHINE\SOFTWARE\Wow6432Node\JavaSoft\Java Update\Policy" -Name "EnableJavaUpdate" -Value 0 -Type DWord -ContinueOnError $True
    Set-RegistryKey -Key "HKEY_LOCAL_MACHINE\SOFTWARE\Wow6432Node\JavaSoft\Java Update\Policy" -Name "NotifyDownload" -Value 0 -Type DWord -ContinueOnError $True

    Remove-RegistryKey -Key HKEY_LOCAL_MACHINE\SOFTWARE\Wow6432Node\Microsoft\Windows\CurrentVersion\Run -Name SunJavaUpdateSched
}
The variable $Is64Bit is another variable defined by PSADT that reflects whether we are running on a 64-bit system or not. This allows us to set the correct Registry entries for both 32-bit and 64-bit systems. Check out the Toolkit’s own guide (the Word document included with the toolkit) to learn about all of these built-in variables - they can save a lot of your own time.
Why are we using Set-RegistryKey instead of PowerShell’s native Set-ItemProperty? Same reasons discussed in part 1 regarding Execute-Process: it provides all the extensive toolkit logging and error checking we would have to write ourselves if we used Set-ItemProperty. Set-RegistryKey also properly handles HKEY_LOCAL_MACHINE instead of forcing us to use the PSProvider path HKLM:\, which is a bit easier on the eyes.
The SunJavaUpdateSched Run key shouldn’t be created since we disabled auto-update through the install config file, but the line won’t do any harm if that key doesn’t exist, and if it does, then it needs to be removed anyway.
Adding the uninstallation
Java isn’t always great about cleaning up after itself, so it’s a good idea to write an uninstall script in here as well.
Fortunately, there’s a toolkit function that can make this process a lot simpler for us: Remove-MSIApplications.
Jump down to the PRE-UNINSTALLATION section (line 146) and modify Show-InstallationWelcome with the same CloseApps parameter we referenced earlier in the PRE-INSTALLATION section.
Next, scroll down further to the UNINSTALLATION section and add this line:
Remove-MSIApplications -Name 'Java 8 Update 101'Seriously, that’s it.
The Remove-MSIApplications function uses the same Windows installer Registry entries as the Programs & Features window in Windows, so in theory, anything that appears in that window can be removed via this function. In practice, it’s usually best to test this first.
Deploying and Using the Package
We’ve done it! Java is packaged up and ready for deployment. Be sure to test this before pushing to production, though…just in case.
The Java8u101 directory we’ve been working in has become our “package” at this point. If deploying through SCCM, you’ll want to copy everything in that folder to your package source folder - keep it all together! If you’re using this manually, you’ll need to copy this entire folder to a target machine first, then run Deploy-Application.exe NonInteractive on that machine. (You can do this using Invoke-Command from your workstation if you have PSRemoting set up.)
Next Steps
By this point, you should have a good feel for how the toolkit functions. You can run EXE files, invoke MSI files, change Registry entries, interact with users, and much, much more. Dig into the toolkit documentation and don’t be afraid to experiment!
I recommend bringing all of your software deployments into the PSADT ecosystem. The toolkit logging alone makes it worth the effort, even for simple installs, and you’ll never need to worry about issues like “what if a user has IE open” again.
Questions? Concerns? Snide remarks? Let me know in the comments!
Until next time.
-replica